Reviewing your finances is simpler than it seems. While many bank statement abbreviations can be confusing, understanding how to process bank statements is straightforward.
You do not need to take a course or training to know how to reconcile a bank statement. It just takes some keen attention to detail to be sure that your business, personal finances, and investments are on track.
Why You Should Regularly Reconcile Your Bank Statement
Accountants recommend regularly checking your bank statements for good reasons. They say spending a bit of time to make sure your money is correctly accounted for is worthwhile. Here are the main reasons:
- Error Detection: Common errors include double charges, unauthorized bank transactions, or bank errors. Not all bank systems are perfect, so personally checking it helps point these out. Regular checks help identify these issues early.
- Fraud Prevention: Reconciliation allows you to spot fraudulent activities quickly. It shows you whether your bank statement and other financial records are balanced. Unrecognized transactions can be a sign of fraud.
- Financial Health: Reconciling allows you if you’re running on the red or still afloat. It gives you a true reflection of your financial status, aiding in better financial planning and decision-making.
Preparing for Bank Reconciliation
Even though managing your bank statements and finances is simple, you should prepare a few things and be mindful to prevent any problems ahead.
Here are what you should prepare:
Gathering Necessary Documents:
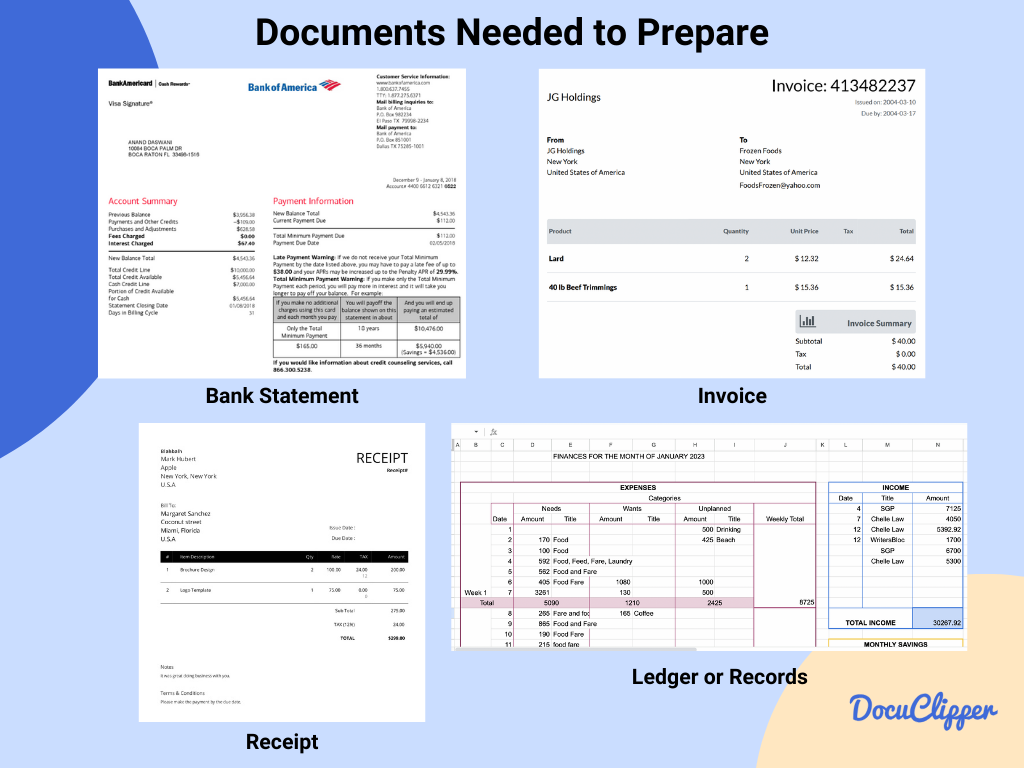
To quickly and thoroughly check your bank account, you need to gather some important documents. Here’s what you should have ready:
- Bank statements
- Receipts
- Transaction records
- Ledgers
The validity of bank statements can vary depending on the bank. In the question of how long to keep bank statements, it should be kept for 3 to 7 years for tax purposes.
Understand the differences between bank statement vs bank reconciliation.
Understanding Your Accounting System:
Different accounting systems, such as single-entry and double-entry, can affect how you reconcile your accounts. Knowing the basics of your system is crucial for accurate bank statement reconciliation.
Single-entry bookkeeping is a simple method based on cash-basis accounting. This system tracks cash inflows (revenue) and outflows (expenses), including all forms of cash transactions like physical cash, checks, credit card payments, and electronic transfers such as debit or wire transfers.
On the other hand, double-entry bookkeeping is more complex and typically uses accrual accounting. It involves five types of accounts: assets, liabilities, equity, revenue, and expenses. Unlike single-entry, which only deals with revenue and expenses, double-entry provides a more comprehensive view of a business’s financial activities.
How to Reconcile a Bank Statement: A Step-by-Step Guide:
Once all documents are collected you can start reconciling your bank statements and finances.
Here is a step-by-step guide on how to reconcile a bank statement:
Step 1: Compare Account Balances
Compare the debit, credit, and total balance of your record and the bank statement. This will help you visualize and track the flow of funds in and out of your account
For a bit of context:
- Debit: When you put money into your bank account, it’s called a debit. This makes your bank account balance go up because you have more money in it.
- Credit: When you take money out of your bank account or pay for something, it’s called credit. Your bank account balance goes down because you’re using some of your money.
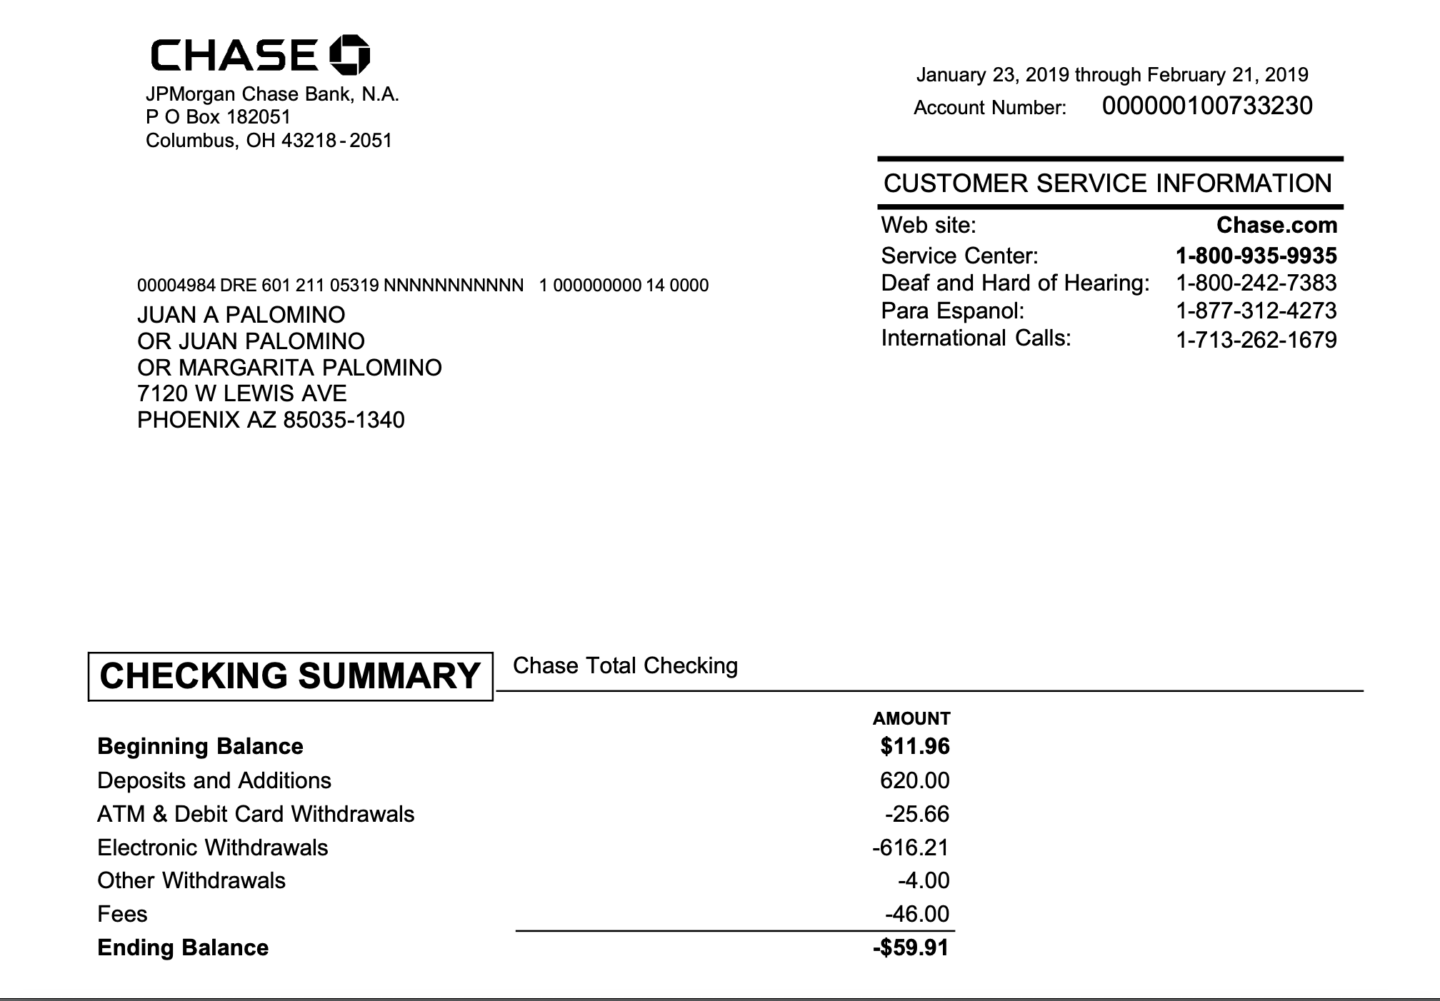
For example, you are receiving a salary through your checking account and your bank statement ending balance is at -$59.91 but according to your records, it should be -$54.91 balance sheet.
According to this, you already have a problem and your records are not matching up with your bank statement. However, you are unsure which parts are the discrepancies and which one is true.
It’s time to take a look at each transaction and see if this is a problem with the bank or our personal records.
Step 2 Convert Bank Statement to Excel
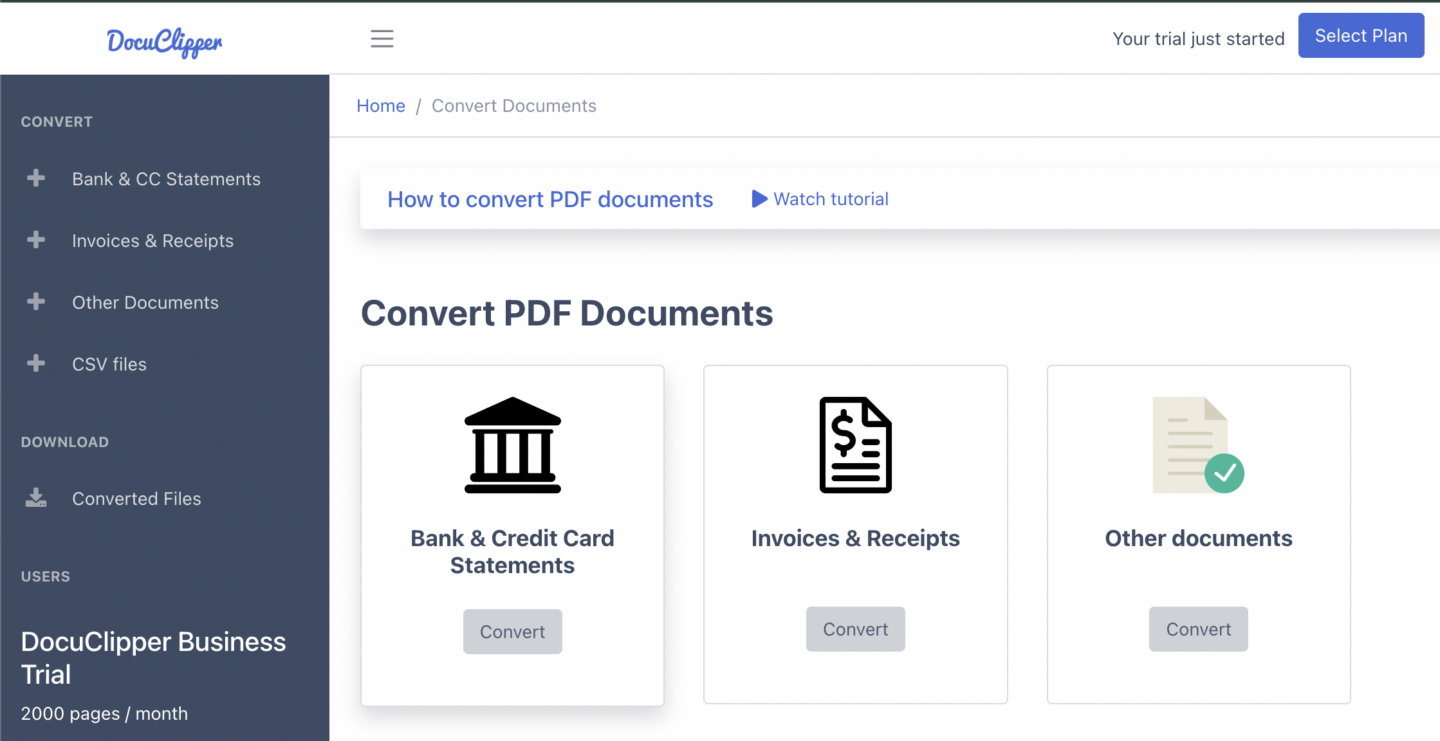
This part can be tedious for many people as bank statements are given noneditable formats whether in PDF, PNG, or real print. Fortunately, there is a way around this than resorting to manually inputting information into a spreadsheet.
There are 3 ways to put your bank statements into Excel.
- OCR Bank Statement Converters: The tools that use OCR technology are designed to transform bank statements into formats such as XLS, CSV, and QBO, Services like DocuClipper can convert bank statements to Excel or other formats.
- Download Statements in CSV: If your bank provides statements in CSV format, you can open them directly in Excel without needing conversion.
- Manual Conversion: This is the most tedious and unfortunately prone to mistakes among these and it requires more attention.
Also, learn about:
Step 3: Match Transactions
Matching transactions between your records and your bank statement is a key step in managing your finances. Here’s a simplified approach to do this effectively:
- Set Up Your Spreadsheet: Make an Excel sheet with columns for the Date, Description, and Amount. Use separate columns for money going out and money coming in. Also, have a column for the running Balance.
- Add More Details: Include extra columns for Categories (like groceries, utilities) or Notes to give more context to each transaction or for remarks during reconciliation.
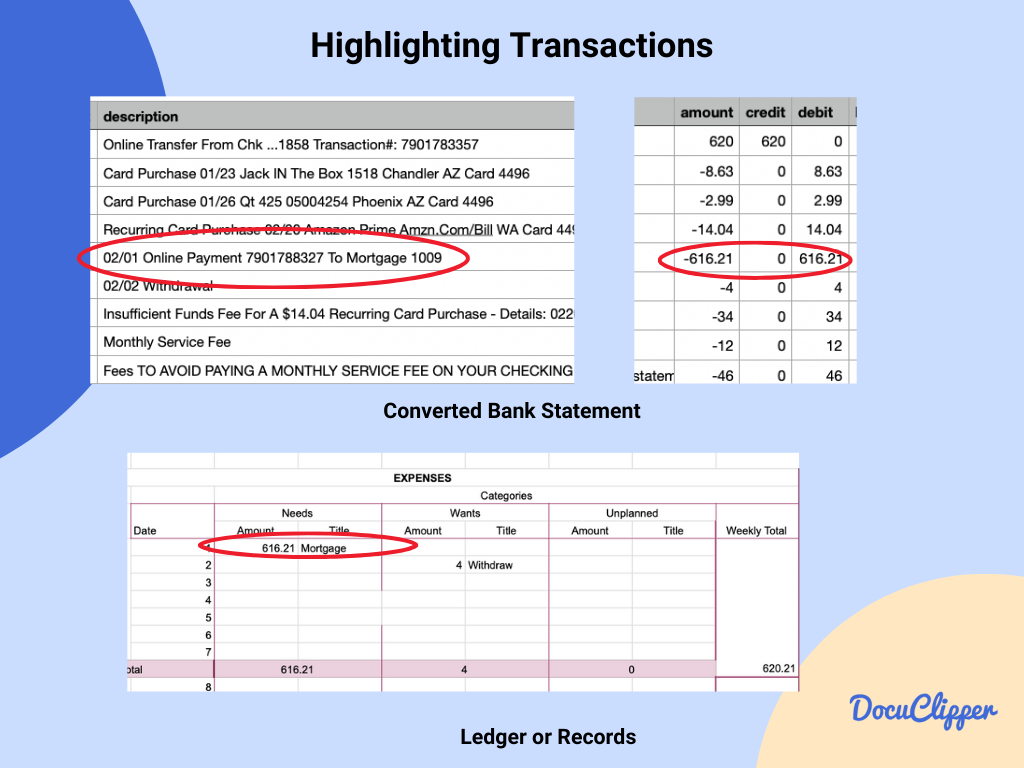
- Highlight Matches: When a transaction in your records matches one in the bank statement, highlight it. This makes it easy to see they’re the same at a glance.
Mark Discrepancies
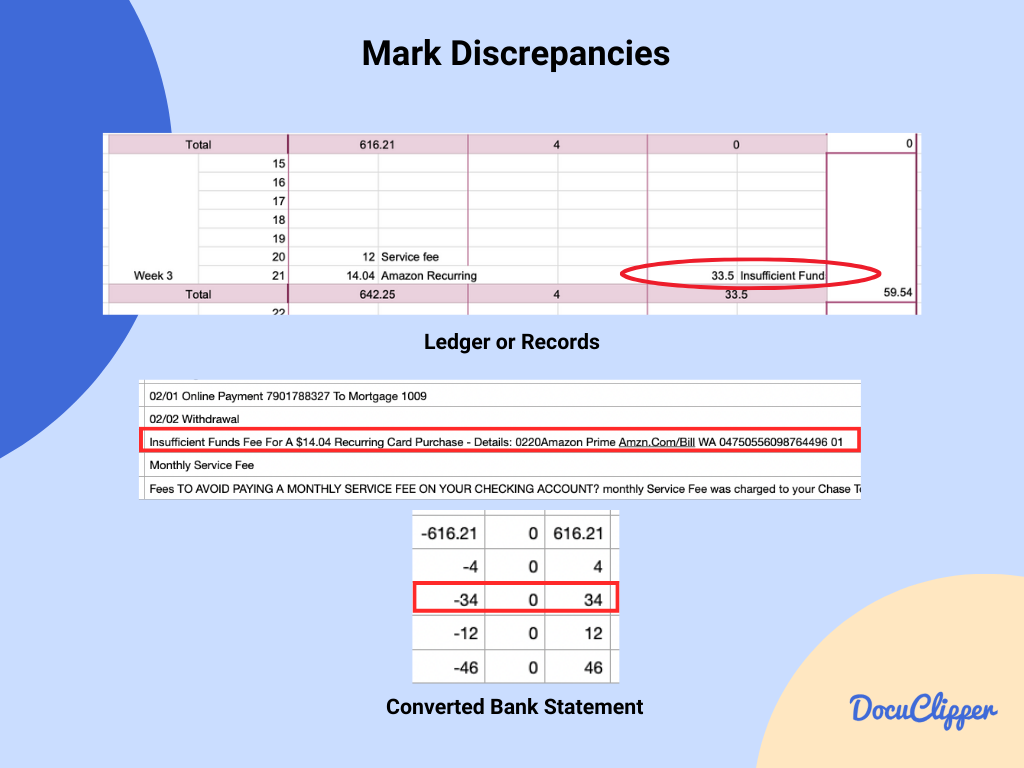
If there’s a transaction in your records that doesn’t match the bank statement, mark it. These need to be looked into more closely. You can start investigating or inspecting as these are the first signs of foul play and mistakes.
Tips for Efficient Comparison
Here are some tips you can use in your spreadsheet to make comparisons easier:
- Use Filters: Excel’s filter feature can help you sort transactions by date, amount, or description, making it easier to find and match transactions.
- Conditional Formatting: Set up rules in Excel to automatically highlight transactions that match or don’t match, based on criteria you set (like the same amount and date).
- Split Screen: If you’re working on a computer, open your records on one side of the screen and the bank statement on the other. This side-by-side view makes comparing easier.
- Regular Checks: Doing this matching process regularly can make each session quicker, as there are fewer transactions to go through.
Match each transaction to see which among has the discrepancies. This could be as minor as a single cent. Use formulas if you converted it into a spreadsheet while actively using a calculator when doing it manually.
Step 4: Identify Discrepancies & Differences
Spotting differences between your records and your bank statement is essential for precise financial management. Through this, you can resolve any problems or questions that you have in the back of your mind.
Here’s a straightforward way to spot and categorize these differences:
- Timing Differences: These are transactions that are in your books but not yet on the bank statement or vice versa, usually because they haven’t cleared.
- Fees: Sometimes, the bank charges fees that you might need to catch up on.
- Genuine Errors: These are mistakes or transactions that don’t fit into the other categories. They could be errors in recording or unauthorized transactions.
In this example. Where there is a $0.50 discrepancy when the bank statement says that there is -$59.91 but according to the records it is only -$59.41. There should be a thorough check on every example to spot the discrepancy.
We successfully identified the issue. It is within Amazon’s insufficient funds recurring cost.
Step 5: Adjust Your Records
Adjusting your financial records is a critical step in maintaining accurate and up-to-date financial information. It depends on which
Here are some straightforward guidelines to follow when you need to make adjustments due to discrepancies like double charges, voided checks, or missed entries:
For Double Charges or Unauthorized Transactions
If you notice transactions that shouldn’t be there, such as double charges or transactions you didn’t authorize, get in touch with your bank or with the supplier right away to dispute these charges.
For Missed Entries
If you find expenses like a $50 fee not recorded in your books, you should make a journal entry to add this expense. This ensures your records match your bank statement accurately.
For Voided Checks or Transactions
If there were transactions that got canceled or checks that were voided, make sure these changes are reflected in your financial records. This might mean deleting an entry or recording a reversal.
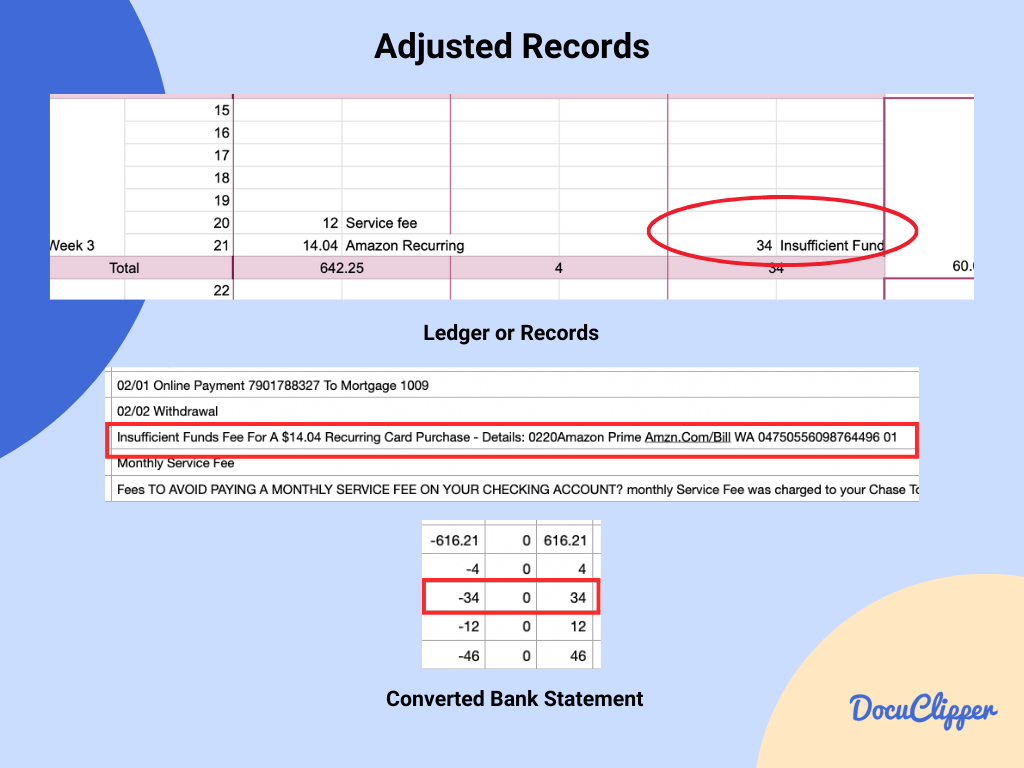
In our example, we have noticed that there is a difference between the charges of $0.50. Contact customer support of the bank or client to confirm the cost whether it is $33.50 or $34.00.
Step 6: Document the Reconciliation Process:
Keeping a detailed record of the reconciliation process is crucial for keeping your financial records accurate and ready for audits. Here’s how to make sure your reconciliation documentation will help you:
There are just a few things to focus on when documenting the process.
- Date of Reconciliation: Note the specific date when the reconciliation was performed.
- Period Covered: Clearly state the period (e.g., month, quarter) that the reconciliation covers.
- Changes Made: Note any changes as they can create confusion when you do not record every move. These changes should reflect your final results.
- Who Performed the Reconciliation: Record the name or initials of the person who conducted the reconciliation. This is useful for accountability and follow-up questions.
When reconciling your accounts, note all discrepancies between your records and the bank statement, including timing differences and unrecognized transactions.
Record how you resolved each issue, whether by adjusting records, canceling transactions, or resolving disputes with the bank. Keep these records well-organized and secure with your other financial documents, in both digital and physical forms, for easy access.
This documentation will be helpful for audits and It also helps identify patterns in discrepancies over time, improving your financial processes.
Step 7: Compare Balances Again
After adjusting your financial records, it’s crucial to verify that the ending balance in your cash account reflects the ending balance on your bank statement accurately.
This step confirms that all discrepancies have been addressed and your books are in alignment with your bank records.
As for our example, we adjusted our records as there was an error within our entry. The call from the bank confirmed that the charge was at $34.00 not at $33.50
Conclusion
It may not be as hard as it sounds you need an accountant for it, but reconciling your accounts is easy when you have the tools and know-how to do it. As long as you know how to read a bank statement, the rest of the process can be smooth.
Reconciling your bank statement is essential for financial accuracy and security. Regularly performing this task helps detect errors, prevent fraud, and ensure financial health.
How DocuClipper Can Help with Reconciling Bank Statement
DocuClipper makes it easy to handle bank statements without typing everything by hand. It uses OCR to change PDFs into formats you can edit, like CSV, XLS, QBO, and TXT. These are then easily linked to accounting software such as Sage, Xero, and QuickBooks
Plus, it can match up bank statements, sort transactions, and analyze finances, making it simple to do all by yourself.


